

Initial Setup and Sensor Attachment
1. Should I buy “SafeWander Sensor“ or “SafeWander Sensor + Gateway“?
2. How long does it take to set up SafeWander and what are the steps?
3. Is it safe to use SafeWander with a pacemaker?
5. Where do I plug in the Gateway?
6. How do I complete the initial registrations on my mobile device?
1. Should I buy “SafeWander Sensor“or“SafeWander Sensor+Gateway“?

SafeWander can be used with or without the Gateway.
If your mobile device is in the same room as the Sensor, you do not need a Gateway or WiFi. This feature enables your loved one to travel with peace of mind.
If you monitor the Sensor from a different room or from anywhere, you need to use a Gateway. WiFi in the bedroom is also required.
How long does it take to set up SafeWander and what are the steps?
It should take less than 10 minutes for you to set up SafeWander, by following the steps below:
(1) Plug the Gateway to an outlet near the bed;
(2) Download the SafeWander App;
(3) Register the user, patient, Sensor and Gateway;
(4) Attach the Sensor to the clothes.
Is it safe to use SafeWander with a pacemaker?
Yes. SafeWander uses Bluetooth Low Energy, and it should not interfere with a pacemaker.
Is WiFi required?
To use the Gateway for remote monitoring, SafeWander requires strong WiFi signal (802.11b/g/n 2.4GHz) in the room.
However, if your mobile device and Sensor are in the same room, they will automatically communicate via their built-in Bluetooth, without going though the Gateway. In that situation, no WiFi is required.
Where do I plug in the Gateway?
Plug the Gateway into the adaptor (included in the package) and then plug it into a wall outlet close to the patient’s bed, ideally within 5 ft. This distance is limited by the Bluetooth Low Energy range between the Sensor and the Gateway in order to save the Sensor battery.
Leave the Gateway in the outlet at all times, even when the Sensor is not in use.
How do I complete the initial registrations on my mobile device?
For the initial registration, you must turn on the Bluetooth of your mobile device.
For Android devices with OS 6.0 (Marshmallow) or later, you must turn on Location service.
(1) Open the App. Create a User Account with your email address and password.
(2) Enter your patient’s name. You have an option to take a photo of the patient by tapping the patient icon. Tap Save on the top right.
(3) Tap New Sensor to register your Sensor. Turn on the Sensor by pushing and holding the button on the Sensor for 3 seconds until the light on the sensor flashes.
(4) Tap New Gateway to register your Gateway. Make sure that the Gateway power light is on; click the button on the Gateway once and the available WiFi networks’ SSID* will appear on the screen. Select your WiFi and enter the WiFi password. Once connected, the light indicators on the Gateway for WiFi, IP Address, Internet and Cloud should all light up in green.
*Android users: the SSID of your WiFi must be 20 characters or less.
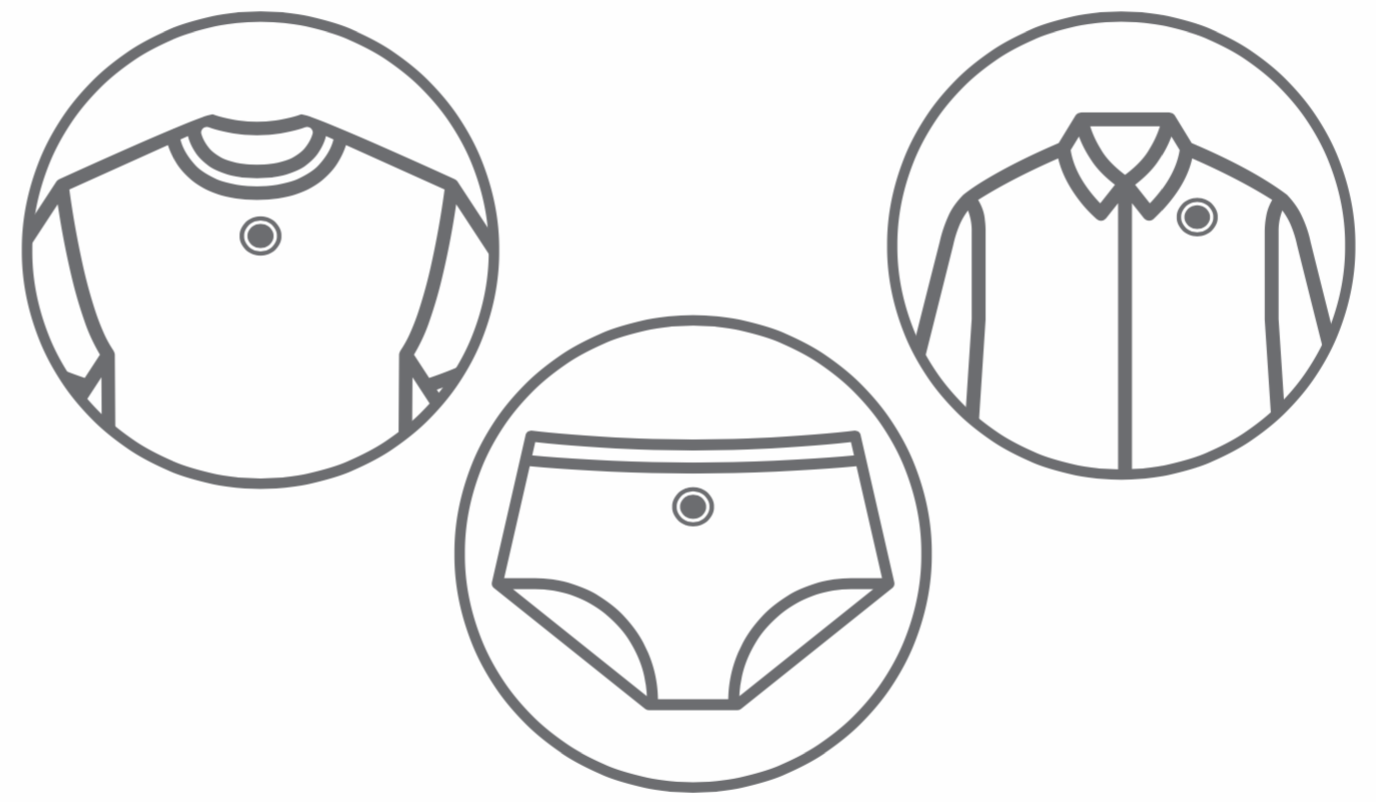
Where do I attach the Sensor?
Properly positioning the sensor is important, because SafeWander detects the person's getting up by monitoring his/her body position. The alert is issued when the upper body’s angle in flexion "i.e. getting up" direction exceeds a threshold. To avoid false alerts, you must attach the Sensor to tight-fitting clothing, including T-shirts, pajamas, underwear, and briefs. Some of the ideal sensor locations are shown below, but we encourage you to experiment and find the most reliable location of the sensor for your patient . You must also make sure that the SafeWander logo is facing you and parallel to the shoulder line.
How do I attach the Sensor?

Warning: After attaching the sensor to clothing, make sure that the SafeWander logo is visible and parallel with the ground when the patient is standing.